Foam Rolling and Stretching

A couple of weeks ago we asked our facebook friends what they most wanted to know about from their Physio’s. Stretching was a topic that came up, so enjoy reading about foam rolling and stretching.

We’re always looking for great ideas, so please let us know if there’s anything further you want to know about and we’ll do the research and write about it here on our website. Happy reading!

Foam Rolling/Stretching

We’ve long thought that stretching regularly helps improve muscle tightness, our flexibility and prepares us for physical activity or exercise. It’s an ingrained part of the pre-match routine for almost every sport. More recently we’ve seen the foam rolling become more and more popular to enhance the effects of stretching. But do stretching and/or foam rolling actually improve our muscle flexibility or performance?

Studies tell us that muscle stretching alone does not decrease muscle soreness or risk of injury during performance. There is some weak evidence suggesting that it may improve muscle torque and it may increase joint range of movement, but there is currently insufficient evidence to back up these findings. The current belief is that in preparation for performance we should be using dynamic stretching (stretching during a movement) rather than static stretching (holding a stretch). When it comes to foam rolling, there has been some research that suggests that foam rolling improves joint range of movement without reducing muscle performance.

Foam rollers allow an individual to use a technique called ‘myofascial release’ on themselves. A form of massage, it breaks down adhesions in the tissues surrounding the muscle and reduces scar tissue. The muscle senses a change in tension in the muscle and in response triggers a relaxation in the muscle spindles/fibres.

The way to use your foam roller depends on the muscle group you are targeting and the effect you are trying to achieve. In this blog we will go through a few of the very common muscle groups where foam rolling is used. For more information about how to use your roller for muscle groups not mentioned in this post, see you Physiotherapist.

ITB Foam Rolling and Stretching
Stretching your ITB using a Foam Roller

ITB: Your iliotibial band (ITB) runs from the crest of your hip, down the side of your thigh all the way past your knee. The best way to roll out your ITB is to prop up on your elbow, place your top foot on the ground in front of you and have the roller make contact with the outside of your thigh. Put as much weight as you can down into the roller. Move your thigh up and down the roller while maintaining this pressure. It may be better to target smaller areas initially that are particularly sensitive or painful and then target a broader area afterwards or in subsequent sessions.

Releasing your ITB can help reduce knee, hip or lower back pain.


Hamstring Foam Rolling and Stretching
Hamstring Stretch using a Foam Roller


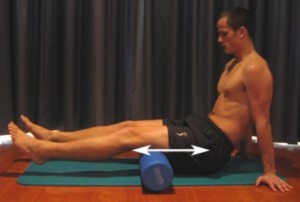
Hamstrings:
Your hamstrings run from the bony part of your buttock down to just below the knee. To roll out the hamstrings, sit on the roller and have your legs in the air. Support yourself using your hands by your side or slightly behind you. Move forwards and backwards on the roller from the bony crest of your buttock down until just above the knee. Again it may be best to isolate the pressure to the area of most sensitivity or tension. Releasing hamstring tension can reduce knee pain, lower back pain and feelings of tension in the hamstrings and gluteals.


Hip Flexor Foam Rolling and Stretching
Stretching your Hip Flexor using a Foam Roller


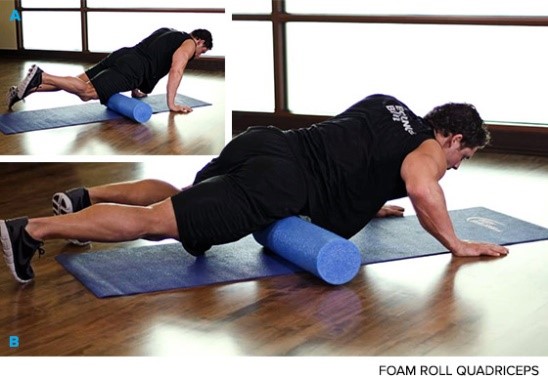
Hip flexor:
Your hip flexors run from your spine to the front of your hip and assist with bending the hip up. When using the roller to roll out your hip flexor lie face down with the roller making contact to the top of your thigh. Ensure you are using the outside edge of the roller so your groin and opposite leg don’t make contact. Roll your leg down the roller until just before the bony point of your hip. Releasing the hip flexor can reduce hip and back pain and is especially important in athletes who are high-volume runners.


Foam rollers can be used on any muscle group in a similar way to good effect. They are becoming more and more popular and you are probably now seeing them in your gym or sporting clubs. If you would like to order a foam roller your Enhance Physiotherapist can order one for you and advise you on how to use it.

Let us know how you go with these stretches.

Stretching/Strengthening for the Psoas Muscle

Recently we asked our facebook friends what they’d like to know more about from our Physio’s.  One friend asked for information regarding stretching and strengthening of the Psoas muscle (pronounced Sow-us).

Psoas Muscle


Psoas Muscle location

So let’s start off by talking about where the Psoas muscle is and what it does. The Psoasmuscle group is one of your major hip flexors, and is divided into two parts – the Psoas Major (in purple) and the Psoas Minor (in yellow). Psoas Major attaches to each of the 5 vertebrae in your lower back then travels down and attaches itself to your femur bone (thigh bone) just below the hip joint. Along the way, Psoas blends together with another muscle called Iliacus (in red) and forms the muscle group known as Iliopsoas. The main role of the iliopsoas is to move your hip into flexion – bending your hip up. If you are currently sitting down, you can activate your iliopsoas by lifting the back of your knee of your seat. Although you need a lot of hip flexion with walking and running, your iliopsoas only has a minor role during these times as a lot of this hip movement is created by momentum. Your iliopsoas however does play an important part in providing stability during walking and running activities. Because it has attachments to your lower back it can stabilise these segments of your spine. However as good as this muscle can be at helping you during running, it can cause a lot of problems once it gets tight because it attaches to your back – it can put a lot of tension on your spine when it is tight. The muscle can get tight due to prolonged sitting (eg desk workers), excessive running/training or due to your lower back posture. This can cause lower back, hip or groin pain during running or walking activities.


Here are a few stretching techniques to improve your iliopsoas muscle length.

Lunge Stretch Psoas Muscle


Lunge Stretch Psoas Muscle

Lunge Stretch: Start in a lunge position, with the hip you are stretching as the back leg. Move your hips and torso as far forward as you can and make sure your back knee doesn’t slide forwards. Keep your torso upright and chest forwards. You can add more of a stretch by incorporating an anterior pelvic tilt – by tucking your buttocks underneath you and moving your pelvic bone towards you.

Thomas Stretch Psoas Muscle

Thomas Stretch: Lie on the edge of a bed/table and pull your knee towards you. Let the other leg hang from the edge of the bed and keep it relaxed. You should feel a pulling at the front of your hip or thigh. This stretch is for the hanging leg.

These are the main two positions I use to stretch my hip flexors, and the ones I recommend to my patients. However there are lots of progressions incorporating different muscles and different body parts into the one stretch that you can try if you find that these two are not giving you much of a stretch.

Alternate Stretches Psoas Muscle


Alternate Stretches Psoas Muscle

Here are a few strengthening techniques:

The Psoas muscle being a hip flexor can be trained using resisted hip flexion exercises such as straight leg raises, sit ups or band/cable resisted exercises. However before I go through a few exercises that I use, I would say that Psoas strengthening is often not required for alleviating pain or improving biomechanics because Psoas weakness is uncommon. The problems involving the Psoas muscle in most cases relate to tightness or overactivity.

Strengthening of the Psoas muscle puts a lot of stress on your lower back, so before commencing these exercises speak with your Physio.

Straight Leg Raise Psoas Muscle Strengthening

Straight Leg Raise: Lying on your back, lifting one leg up while keeping your knee straight, then slowly lower leg back done. Make sure you don’t arch your lower back during the exercise.

Leg Lifts Psoas Muscle Strengthening


Leg Lifts Psoas Muscle Strengthening

Leg Lifts/Straight leg raise: Lift your feet off the floor and bend your hips to 90°. Keep your knees slightly bent throughout. There are several different variations to this exercise – it can be done as a hold by keeping your feet hovering about 2cm off the ground for as long as possible, or add ankle weights to increase the difficulty. This exercise requires good core stability to perform it safely. If you haven’t got great core strength, or can’t do the exercise without arching you lower back then don’t perform the exercise

Standing Hip Flexion Psoas Muscle Strengthening


Standing Hip Flexion Psoas Muscle Strengthening

Standing Hip Flexion: Start in standing with your one leg slightly behind you and a theraband or pulley around your ankle while the other point fixed behind you. Lift your leg up so that your hip and knee are bent to 90°, then lower back down. Keep your hips level throughout the movement.

Strengthening your Psoas muscle is not always necessary, as it isn’t a muscle that requires large amounts of power during day-to-day activities. However if you are feeling like you are lacking power during kicking or other activities then some of these exercises might be helpful.

If you are experiencing pain or problems at the front of your hip, groin or your lower back then seek the advice of one of our Physiotherapists at Enhance Physiotherapy. They will be able to advise you which type of exercises you need to do to minimise your pain and optimise your performance.

Anterior Cruciate Ligament (ACL) injury rehab

Stef’s Anterior Cruciate Ligament (ACL) Injury Treatment

Stef Yeh is one of our fantastic Physio’s here at Enhance Physiotherapy. She started at the Mandurah clinic earlier this year after moving from Melbourne. She has always been a keen sportsperson and in the past has played soccer at an elite level. Shortly after starting work here in Perth she ruptured her right anterior cruciate ligament (ACL) while playing a social soccer match. Stef has kindly granted us permission to follow her recovery with a series of blogs to give us an insight into the rehab protocol after a major injury. We’ve asked Stef to describe her injury for us:

‘’A few months ago after moving from Melbourne to Perth, I injured my knee following an awkward tackle while playing soccer. During the incident, I felt my knee pop and immediately knew something wasn’t right. After being assessed by my wonderful colleagues I was off for an MRI scan. Results showed that I had a complete rupture of my anterior cruciate ligament (ACL)”

Complete anterior cruciate ligament (ACL) ruptures typically require surgery where a graft is taken of the hamstring tendon or the patella tendon and is this is used to reconstruct the anterior cruciate ligament (ACL) to support the knee. This injury also has a long recovery time, usually in excess of 12 months to return to sport. In order to return to sport the person needs to undergo a long period of rehabilitation to increase the strength in the muscles around the knee to a level where they are strong enough to prevent re-injury.

Post Anterior Cruciate Ligament (ACL) Operation Recovery
Post Anterior Cruciate Ligament (ACL) Operation – Enhance Physiotherapy

Stef had a right anterior cruciate ligament (ACL) reconstruction six weeks ago:

“Immediately after the operation I was able to put weight on my leg with minimal support. I returned home from hospital the next day and spent about two weeks resting and focusing on swelling and pain management. I am now up and moving about and have already gone back to work. Although walking can be slow and frustrating, I have actually had very little pain. However, I have lost a lot of strength in my right leg and I can see an obvious change in the size of my leg muscles compared to my left leg. Currently my rehab goals are focussed on getting full movement in my knee and doing some gentle muscle exercises.”

Although it’ll be a long time before Stef is able to play soccer again, she is already making great progress with her rehabilitation and her strength is improving every week! We will keep you updated on Stef’s progress. A big thanks to Stef and we wish her a good recovery!